21 Google Calendar Tips To Maximize Its Use

Think you know all about Google Calendar? Think again! We share 21 tips and tricks to make the most out of Google Calendar to maximize its use.
Devesh Pinjani
Devesh Pinjani

Content Writer

Reading time: 12 minutes

Google Calendar is used by many to stay organized, keep track of their daily activities, and stay connected with people all over the world. 

Aside from scheduling appointments, Google Calendar can do much more. And let’s be real here — while Google has a ton of amazing features for its calendar app, we probably don’t know how to use all of them. We might not even know some of these features exist! 

With that said, let’s take a look at these tips and tricks to make the most out of Google Calendar.

Contents

What is Google Calendar?

Google Calendar is a free web-based calendar that allows you to schedule and share your personal and business calendars with others. 

As more and more businesses take their business online, Google Calendar has become a must-have tool for many. With native integrations with Google’s apps, like Google Meet and Google Maps, you can easily manage and schedule meetings, organize daily tasks, and set reminders.

But this is just the tip of the iceberg and while it may seem like just another scheduling app, Google Calendar has plenty of great features that can help you better manage your daily life.

21 Google Calendar tips

1. Change your calendar view

Did you know you could choose how much of your schedule you want to see when you open it?

Usually, when you open your Google Calendar, it’ll only show you the schedule for that particular day. This calendar view is good if you have packed schedules and want to solely focus on that day’s activities. But, you can further customize it to show you weekly, monthly, or even yearly appointments. 

To change your calendar view, click on the tab that says ‘Day’ right beside the settings icon. A dropdown menu will appear and you can select weekly, monthly, or even custom day schedules. 

To set a custom schedule, head to Settings > View options > Set custom view. You can choose from several number of days, from 2 days up to 4 weeks. 

2. Use ‘Find a Time’ & ‘Suggested Times’ when scheduling a meeting

When you’re scheduling meetings, it’s important to remember that time is of the essence. If you don’t schedule your meetings on time, there’s a good chance that people will cancel, or maybe even reschedule the meeting at a later date.

The easiest way to avoid these problems is by using the “Find a time” feature when creating an event. After selecting this option, the system will show you the schedules of every employee/client, as long as they use Google Calendar.

Another solution is to go with the “Suggest a time” feature.  By using this, the system will assess everyone’s schedule and automatically produce a list of possible meeting times from which you can choose the one that best suits everyone’s needs.

To use it, you have to simply click on find a time in the window that pops up whenever you create an event.

Use this Google Calendar tip to find a common meeting time between invitees.

3. Enable desktop notifications

Let’s be honest — we’ve probably missed one too many meetings because we were caught up with work or other responsibilities. 

To avoid missing appointments, you can enable desktop notifications to remind you about your upcoming scheduled meetings. You can configure these notifications to alert you a few minutes before the meeting, or up to a few weeks. 

To enable this, you need to:

  1. Click on the ‘Settings’ icon > Notification settings.
  2. Click on the ‘Notifications’ dropdown and select ‘Desktop notifications’.
  3. You can also check the boxes to play notification sounds and notify you only if you’ve responded ‘Yes’ or ‘Maybe’ to an event.

4. Enable Google Calendar notifications on Slack

If your business uses Slack heavily, this tip would be extremely helpful. Similar to enabling desktop notifications, you’re now enabling reminders on Slack. You can set a specific reminder time, say 1 minute before the meeting, and you’ll be notified in a dedicated Slack Channel for Google Calendar.

Use this Google Calendar tip to enable Slack reminders.

You can also directly RSVP to meetings from Slack itself. Simply click on the ‘Going?’ dropdown to reveal your options. 

To set it up:

  1. Log into Slack’s web version and head to the Slack App directory here
  2. Search for ‘Google Calendar’ and click on the app. 
  3. Click ‘Install’ and ‘Allow’.
  4. Choose your Google account and grant access to Slack. 
  5. You’ll then be redirected to your Slack workspace to set up automatic status updates and notifications. You can change or update your preferences anytime by typing in /gcal in Slack. 

5. Set a ‘Default Duration’

If you are feeling like your meetings tend to drag on for longer than they should, this tip is for you! 

By default, Google Calendar sets a 60-minute duration for every meeting when you create one. However, you can change this to easily fit your schedule and shorten the types of meetings you create. 

While you can manually change the timing when you create a meeting, this can be time-consuming if you create multiple similar meetings. Once you’ve changed this, every meeting you create will automatically reflect the duration you’ve chosen. 

To do this, click on Settings > Event Settings and you’ll see the option to set a default duration. You can choose timings between 15 minutes to 120 minutes, which is the maximum time allowed by Google Calendar.

6. Add attachments to your event

Have you ever faced a situation where you are in the middle of a meeting and feel the need to mention a document? Or when you had to spend hours after a meeting emailing the participants all the documents you’ve discussed in that meeting?

To stop such situations from occurring again, you should keep all the required attachments ready before the meeting. 

Google Calendar allows you to do just that. Here’s how:

  1. Click on your event in the calendar view and select the pencil symbol to modify the event* and add a document. 
  2. Look for a paper clip icon directly above the description area once you’re in the event’s edit screen. When you click this button, a window will open where you can add files from your computer or Google Drive.
  3. Once you’ve selected your files, click ‘Insert’. 

*If you already have an existing event, simply click on ‘Add descriptions or attachments’ to upload your files.

7. Integrate Google Calendar with your website

If you don’t have the time to manually create every event in Google Calendar, then this tip will save you tons of time and effort. Google Calendar allows users to integrate other Google or third-party apps to manage your business better. 

You can embed the calendar directly into your website or integrate it with your email. This way, whenever someone sends you an email regarding scheduling a meeting, your calendar will automatically get updated. 

Here’s how you do it: 

  1. Open your ‘Settings’.
  2. On the left side of the screen, click the name of the calendar you want to embed.
  3. A dropdown will appear, in which you click on ‘Integrate calendar’.
  4. Under the embed code, click ‘Customize’ to edit the design of your calendar. If you’re satisfied with the look and style, simply skip this step. 
  5. Once you’re done, copy the iframe code and paste it into your website.

Your embedded calendar will only be visible to people you’ve shared it with. To allow all visitors to see your calendar, you’ll have to make it public.

8. Set working hours

Ever had a client book a meeting outside of your working hours? This is a common occurrence that happens when you don’t set boundaries for your working hours or when you work in a different time zone. Your clients might not be aware of your schedule, so never let such a dreaded situation happen again by setting your own working hours. 

By specifying your work hours, you can inform the client that you wouldn’t be available at certain parts of the day, or that you knock off at this time in the evening. This will further reduce the hassle of declining and rescheduling meetings. 

To set your working hours, simply click ‘Settings’ > ‘Working Hours’ > Check the box and specify your work timings. You can add multiple timings to one single day, and easily copy the time to all days. 

Use this Google Calendar tip to set working hours.

9. Enable keyboard shortcuts

You know the saying: Time is money. Well if this is your life motto, you’re in luck because every feature in Google Calendar is to help you save your time, including this one. 

With the Google Calendar’s keyboard shortcuts, you can create events or navigate your way around different settings just by clicking a button. This makes the entire scheduling process much more efficient. 

Here are some useful shortcuts you can use: 

  • “C” to create a new event.
  • “T” to view the current day.
  • “+” to open the add calendar section.
  • “J” or “n” to scroll to the next date range.

To enable the shortcuts, go to ‘Settings’ > ‘Keyboard shortcuts’ > Check the box in this tab. After you turn on the keyboard shortcuts, you can see all the shortcuts you can use by typing a question mark ‘?’.

10. Add Google Hangouts

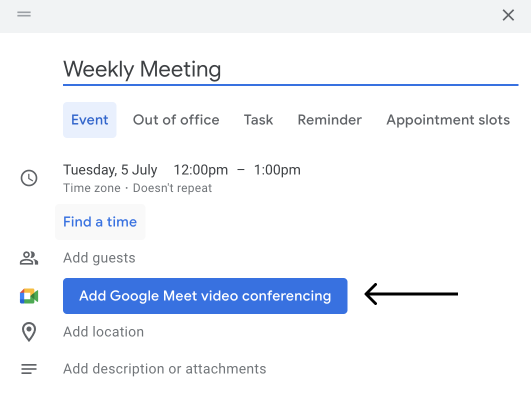
If you’re hosting a meeting with clients who are joining you remotely, it’s highly recommended that you integrate with Google Hangouts app into your calendar. 

Your invitees do not need to download any additional software because you have the ability to set up a video conference within your event. 

To do this, simply click ‘Add Google Meet video conferencing’. A Google Meet URL will automatically be generated and be shown to all invitees involved in the meeting. 

Use this Google Calendar tip to add Google Hangouts to your meetings.

Of course, if you’re a fan of Zoom and are more familiar with it, you can easily integrate Zoom into Google Calendar under ‘Settings’ > ‘Get add-ons’ > Search for ‘Zoom for Google Workspace’ > Install.

12. Offer more Google Meet numbers

I wish I had known about this feature earlier — it comes in really handy when your invitees are going to be listening in on your meeting by dialing in through their phone.

You can even offer phone numbers specific to each country — Japan, New Zealand, Iceland, and many more. This way, invitees from all over the world aren’t restricted to only attending your meeting via video call.

Use this Google Calendar tip to add Google Meet phone numbers
Use this Google Calendar tip to add Google Meet phone numbers.
Use this Google Calendar tip to add more international Google Meet phone numbers.

12. Share your calendar

Google Calendar enables you to share your calendar with anyone with a simple link. By doing that, they can access your calendar on their own Google Calendar page. They’ll also be able to see when work-related events are happening and when they’re available to attend.

Giving anyone full access to your calendar means they can:

  • Respond to invitations
  • Create and edit events
  • Share your calendar with others
  • Receive emails about changes to your calendar
  • Delete your calendar

To share a calendar, click on ‘Settings’ > ‘Settings for My Calendars’ and choose a calendar > ‘Share with specific people’ > ‘Add people’ and type their email address or name of the individual with whom you want to share it.

Use this Google Calendar tip to share your calendar.

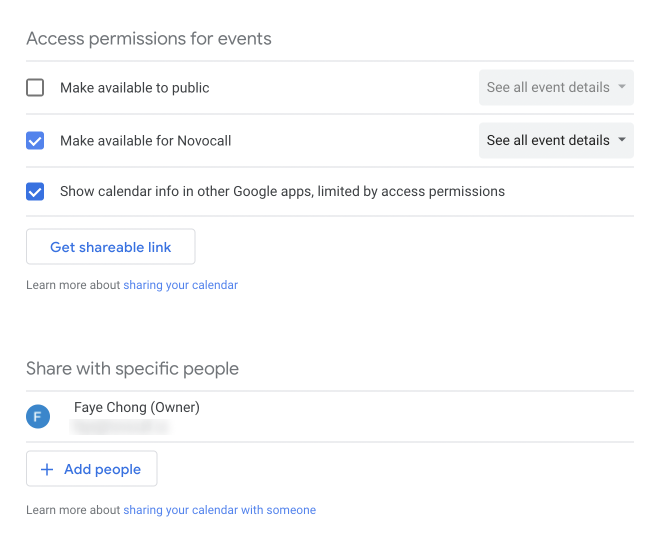
You can either share your complete calendar or create a new calendar specifically for the event.

13. Manage your day-to-day tasks

Google Calendar has a great feature to help you manage your daily routine. With its ability to include your daily tasks into it, you’ll be able to better manage your time and stay on top of all of your projects. 

Here’s how:

  1. On the left, under ‘My calendars’, check the box that says ‘Tasks’. This enables your tasks to be shown on calendar view. You can change the colour of your tasks by clicking on the 3 ellipses.
  2. Create an event and choose the ‘Task’ tab on the top right. Enter a title and description. 
  3. When you’re done, hit ‘Save’

14. Keep your calendar confidential

Do you ever wonder if your coworkers secretly spy on what your day-to-day activities are? Even if they are not, and you like to keep things private, you can switch your calendar to private. 

This guarantees that no one knows what meetings you have for the day and gives you the utmost privacy for sensitive discussions. 

Here’s how you can do it:

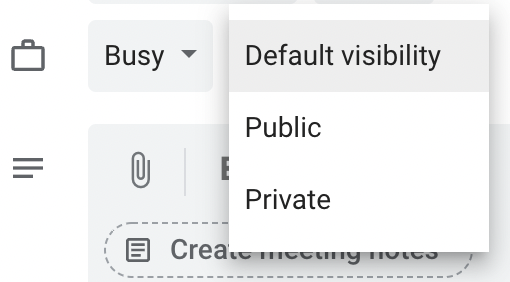
  1. Open a specific event (or create one) and click on the pencil icon to edit it.
  2. Next to the briefcase icon, click on the ‘Default visibility’ dropdown and select ‘Private’.
  3. Click ‘Save’.
Use this Google Calendar tip to keep your calendar confidential
Use this Google Calendar tip to keep your calendar confidential.

This will prevent anyone from looking at your weekly schedule from seeing the specifics of an event, such as the name of the meeting, its participants, and any attachments.

15. Email all guests at once

Imagine if you forgot to mention an important detail to your invitees, and now you have to send an email to each one of them. While this is manageable if you only have one or two attendees, it’ll be a real nightmare if you’re hosting over a hundred people.

Luckily, Google Calendar saves you from the trouble. As long as you’ve added every guest who’ll be attending to the event, you can send everyone the same email. 

You can do this by selecting the event block in your calendar view and clicking on the envelope symbol. An email window will pop-up where you can compose an email to all attendees, then click ‘Send’.

Use this Google Calendar tip to email all guests at once.

16. Set automatic reminders

Since you can set appointments months before the date, it is crucial that you have enabled reminders to notify you before the event. 

With this Google Calendar trick, you can set automatic reminders and avoid any unfavorable situations. 

To set an event auto-reminder in Google Calendar, follow these steps:

  1. Click on ‘Settings’.
  2. Then, click on ‘Settings for my calendars’ on the left.
  3. Scroll down to ‘Event notifications’ and select how the duration of the event reminders (you can select from hours, days, or weeks). 
  4. Select the medium of your reminders such as emails or notifications.
  5. Choose “Add Reminder”.

17. Add religious holidays to your calendar

It can be a challenge to manually keep track of all the holidays and celebrations around the world. It’s even harder when you’re trying to align specific marketing campaigns to each holiday, or if you need to plan something around the holidays. 

Also, you’ll have to properly manage employee schedules if you have staff that are from different parts of the world. 

Luckily, you can add and remove the holidays in your Google Calendar so they are more in sync with different religions and holidays. This also comes in handy to inform employees of when is the ight time to take their annual leaves or day offs. 

Here’s how you can use this feature:

  1. On the left, under the ‘Other calendars’, click on the Plus icon to ‘Add other calendars’ and browse calendars of interest.
  2. Once you’ve found a calendar that suits your employees, location, and business activities, check the box next to it to add it to your calendar. 
  3. You can also click on the eye icon on the right to preview the dates of the calendar. 
  4. To remove a calendar, uncheck the box next to it.

18. Transfer ownership of your event

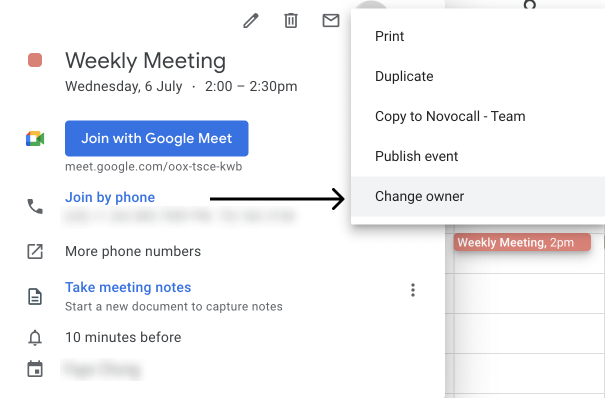
When you’ve created an event in Google Calendar, you’ll naturally be the organizer. If you need to transfer the ownership of the event to someone else, you can easily do it! 

This gives them more control over the event, such as freely being able to edit the attendee list, change the event timing, and more.

To change the ownership, simply select an event > Click on the 3 ellipses > ‘Change Owner’ > Type in the email address or name of the person you wish to designate this meeting to. You can even type in a special message with instructions, or leave it as the default ‘I would like to transfer ownership of this event’.

Use this Google Calendar tip to transfer ownership of your event.

19. Send your daily to-dos to yourself

This tip is extremely useful for busy professionals who don’t have the time to check their calendars for every single schedule they have for the day. Instead of manually creating a to-do list for yourself, you can get Google Calendar to summarize your schedules and send it to you!

To do this, follow these steps:

  1. Go to Settings and choose your calendar under ‘Settings for my calendars’.
  2. Under the ‘Other notifications’ tab, change the ‘Daily agenda’ option from ‘None’ to ‘Email’.
Use this Google Calendar tip to send your daily agenda to yourself
Use this Google Calendar tip to send your daily agenda to yourself.

20. Add physical meeting locations to appointments

If you’re taking your meetings offline, this tip will be extremely helpful. Instead of going back and forth regarding the exact location of the meeting, simply add it to the event and your attendees will be notified.

Use this Google Calendar tip to add physical meeting locations to appointments
Use this Google Calendar tip to add physical meeting locations to appointments.

You can type in the exact location or let Google select one that best fits your description. For example, just typing in the broad term ‘Starbucks’ helps me pull up several outlets in different areas. You can choose one that best fits your location. 

Alternatively, you can select the maps icon at the right side to pull up Google Maps, where you can select the location from Google’s pins.

21. Sync your personal and work calendars

If you’re a heavy Google Calendar user and have multiple calendars, you might want to sync them together to have a coherent view of all your schedules.

You can have an overview of every single activity you have planned, whether it be work or personal, so you can prevent overlapping of schedules or missed appointments.

Here’s how you can do it:

  1. Click on ‘Settings’ of the calendar you want to export.
  2. Scroll down to the ‘Import & Export’ option.
  3. Export your calendar.
  4. Then head into your other calendar, click on ‘Settings’.
  5. Scroll down to the ‘Import & Export’ option.
  6. Import the calendar you just exported in step 3.

Do more with Google Calendar today

And there you have it! 21 amazing Google Calendar tips and tricks to help you manage your schedule better and make the most use out of this free app!

Google Calendar is undoubtedly an amazing free scheduling tool. It is simple to set up, requires little to no technical knowledge, and has a ton of in-built features. 

Through this post, we hope that you got a better understanding of what you can do with Google Calendar.

For more of such tips and tricks, check out our blog!

Devesh Pinjani
Devesh Pinjani

Devesh is a content writer at Novocall.

Subscribe to our blog

Get insights & actionable advice read by thousands of professionals every week.

Time for more productive meetings.
TimeSync is your new favorite appointment scheduler.